Thursday, 14 February 2013

How to Integrate Salesforce services with Oracle Fusion Middleware ?

Introduction

Recently there was a requirement of a customer to integrate Salesforce.com web-services with Oracle Fusion Middleware/Oracle SOA.
Scenario was, a SOA composite will try to access Salesforce services. We need to configure Oracle Fusion Middleware to access the Salesforce services (external web-services) outside the firewall.

To achieve this we need to perform two steps:

Install the salesforce web services certificate in the Weblogic Trust store (DemoTrust.jks or cacerts)

Download the certificates by accessing the web-service and then import the certificates using Java Keytool
  • keytool -keystore "DemoTrust.jks" -import -alias "test.salesforce.com" -file "test.salesforce.com.crt"
Verify if the certificates are added or not by giving the following command:
  • Keytool -list -keystore DemoTrust.jks
Second Step is to configure the proxy in SOA Domain to access the remote SalesForce services

For SOA services to communicate to external web-services we need to configure proxy in SOA Server/Weblogic.
Following changes need to be made in setSOADomainEnv.sh (Linux Environment)

The EXTRA_JAVA_PROPERTIES variables needs to be modified as follows

EXTRA_JAVA_PROPERTIES="${EXTRA_JAVA_PROPERTIES} -Dhttps.proxySet=true -Dhttps.proxyHost=proxy.aj.com -Dhttps.proxyPort=443 -Dhttp.nonProxyHosts=localhost|127.0.0.1"

export EXTRA_JAVA_PROPERTIES

https.proxyHost: Your proxy Host
https.proxyPort: Your proxy port, 443 is the default port for https
http.nonProxyHosts: Your non proxy servers, the list can be separated with a "|"

After all the changes are done, restart the complete domain.

Thursday, 24 January 2013

How to develop a SOA Composite using JDeveloper ?

Introduction

Starting point of any new technology or language is to make it say 'Hello'. Personally, for me to get acquainted to a new programming language is to write a 'hello world' program. Same I would like to do today by showing you how to develop a Simple Hello World Composite.

Before Starting with SOA development, make sure you have:

  • SOA installed
  • Jdeveloper with SOA Extension Enabled
Let us get Started.

Overview:

We will create a SOA Composite which will take input as a String(your name) and return the output as Hello <String Entered>.

Developing a Composite:

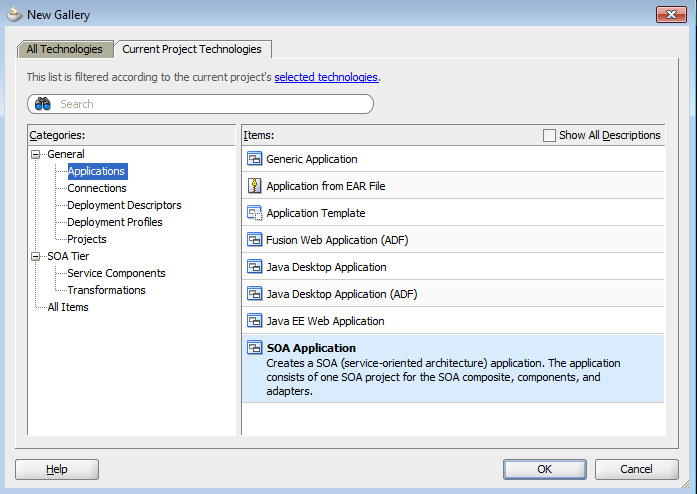
Open Jdeveloper and create a New Application by Navigating to File->New->Application->SOA Application. Click on Ok.


Enter the name of the Application in the next screen:


Enter name of the Project (HelloWorld) and make sure SOA is selected as shown.Click on Next.


 Now select the option 'Composite with BPEL Process'. Click on Finish.


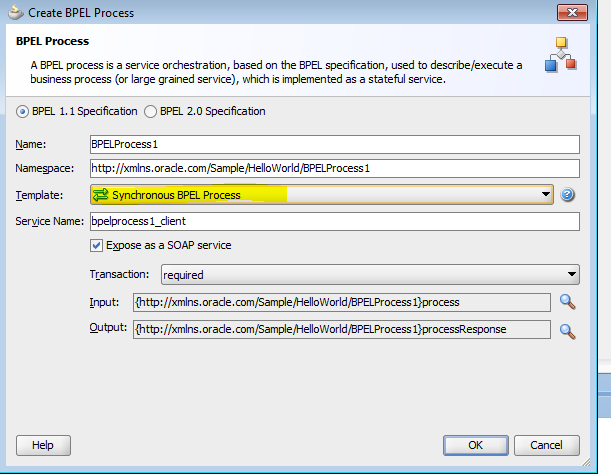
Select 'Synchronous BPEL Process' from the drop down. Click on Ok.


Now you have successfully created a basic composite with a Synchronous BPEL process. It should look something like this:

Next step is to do some configurations in our BPEL Process so that it can understand what it needs to do.

Double click on the BPEL Process. You will see the below screen. 
Now you can make out easily what we are trying to do. It is same Java Programming. Some Input/Output variables.Some transformations, assignments, connection. 

Here we have a client, which will send a request (so it has a receive activity). It also has the power to give Output (hence replyOutput activity). So what is missing ???
We need to concatenate the input with 'Hello' and assign it to the output variable.


To achieve this, add the assign activity by dragging it from BPEL Constructs(see the right side of the pane)


Now the assign activity is added, we are ready to concatenate. 
Double click on Assign Activity.
We want to assign input to the process to the result, after concatenating 'Hello' to the front.
Drag the function (highlighted) on the result variable.
In this screen, Select String Function from the drop down, double click on concat, you can see the format/description of the function.
It accepts arguments in quotes separated by comma.
Give the First argument as 'hello'.
For second argument, double click on client input string after expanding input variable.

Click on Ok and Apply and save it.

Now you are ready to deploy your first BPEL Project on your SOA Server.
Start your SOA server if not already started.

Steps to create an Application Server connection in Jdevloper:

Click on File->New->Connection->Application Server Connection.
Give the connection name and click on Next.


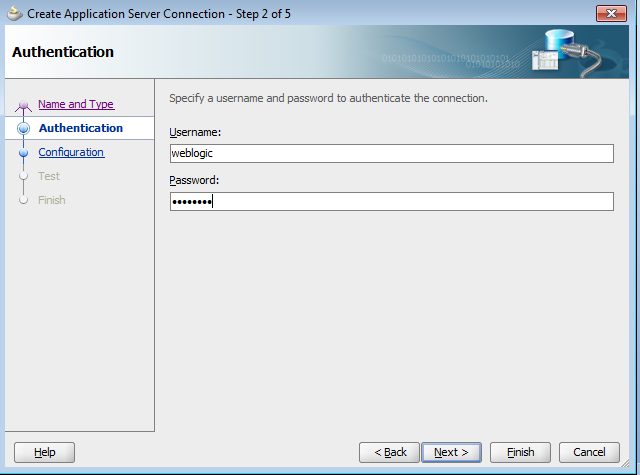
Give the Username and password to connect to Admin Server.


Give the Hostname,  Port number of Admin Server and name of your domain. Click on Next


Give Test Connection. If all the test are successful. Click on Next and then Finish.


Deploying the Composite:

Right click on the project and select deploy as shown:
Select the Application Server connection you created in the next couple of screen and at the end click on Finish.

If you see the above screen, it means you have successfully deployed the composite on the SOA Server.

Now time to test our HelloWorld composite :)

Login to EM Console. Click on your composite. Click on Test Button. Enter the input as shown:

Click on Test Web Service Button. You will see the output as below !


Voila :) 
You have successfully created, deployed and tested a SOA Composite !!!
Welcome to SOA Development with JDEVELOPER
Explore and learn from here ;)

Cheers

Wednesday, 17 October 2012

How to Check Oracle Fusion Middleware and Weblogic version Installed ?

We can use one of the below methods to find which version of Oracle Weblogic is installed on our system.

1.From the Weblogic Console(http://hostname:port/console):

On the below left side you can find the version(10.3.5 as per output)

2.From registry.xml in Middleware home:

Go to Middleware home where weblogic is installed. Open the file registry.xml and search for “component name=”WebLogic Server" version=”10.3.5.0″  (variable version next to this will tell you weblogic version installed)

3.From the class weblogic.version:

 Go to directory $WL_HOME/server/bin and run below command

$ . ./setEnv.sh
$ java weblogic.version

You should see some Output like:

WebLogic Server 10.3.5.0 WedOct17 10:37:33 PST 2010 1384255
Use ‘weblogic.version -verbose’ to get subsystem information


4.For Fusion Middleware products use the Opatch Utility to find the versions of the product installed:

Navigate to <MW_HOME/<Product_Home/Opatch>

Example:
$ cd /Oracle/Middleware/Oracle_SOA/Opatch
$ ./opatch lsinventory

You should see Output like: 

Invoking OPatch 11.1.0.8.3
Oracle Interim Patch Installer version 11.1.0.8.3
Copyright (c) 2010, Oracle Corporation. All rights reserved.
Oracle Home : /Oracle/Middleware/Oracle_SOA
Central Inventory : /Oracle/Middleware/oraInventory
from : /etc/oraInst.loc

OPatch version : 11.1.0.8.3
OUI version : 11.1.0.9.0
OUI location : /Oracle/Middleware/Oracle_SOA/oui

Log file location : /Oracle/Middleware/Oracle_SOA/cfgtoollogs/opatch/opatch2012-10-27_22-53-47PM.log
Patch history file: /Oracle/Middleware/Oracle_SOA/cfgtoollogs/opatch/opatch_history.txt
OPatch detects the Middleware Home as "/Oracle/Middleware"
Lsinventory Output file location : 


/Oracle/Middleware/Oracle_SOA/cfgtoollogs/opatch/lsinv/lsinventory2012-10-27_22-53-47PM.txt

--------------------------------------------------------------------------------

Installed Top-level Products (1):
Oracle SOA Suite 11g 11.1.1.5.0
There are 1 products installed in this Oracle Home.
There are no Interim patches installed in this Oracle Home.
--------------------------------------------------------------------------------
OPatch succeeded.


5.For Fusion Middleware products, you can also Navigate to respective home location of the installation and   give the below command:

$ cd $ORACLE_SOA1/bin
$ ./soaversion.sh

Output:

**************************************************************
INFO: Detected a WebLogic Installation.
**************************************************************
*****************************************************************************
Oracle SOA Server version 11.1.1.5.0
Build: 0
Build time: Mon Apr 18 18:05:14 PDT 2011
Build type: release
Source tag: PCBPEL_11.1.1.5.0_GENERIC_110418.1550.0174
Oracle BAM Source Tag:ORABAM_11.1.1.5.0_GENERIC_110330.1900
Oracle BPM Source Tag: PCBPEL_11.1.1.5.0_GENERIC_110418.1550.0174
Oracle Implementation-Version: Oracle Middleware 11.1.1 (ASKERNEL_11.1.1.5.0_
GENERIC_110418.2020, ADMINSERVER_11.1.1.5.0_GENERIC_110322.2200, J2EE
_11.1.1.5.0_GENERIC_110329.0915, JDEVADF_11.1.1.5.0_GENERIC_110409.00
25.6013, TOPLINK_11.1.1.5.0_GENERIC_110305.0900, ENTSEC_11.1.1.5.0_GE
NERIC_110326.1205, FMWCONFIG_11.1.1.4.0_GENERIC_RELEASE)


6. To find the version of OHS installed on the System. Give the below commands:


$ export ORACLE_HOME=<Directory where OHS is installed> 
$ export  LD_LIBRARY_PATH=$ORACLE_HOME/ohs/lib:$ORACLE_HOME/opmn/lib:$ORACLE_HOME/lib: $LD_LIBRARY_PATH
$ cd $ORACLE_HOME/ohs/bin
$ ./httpd.worker -version

Output:

Server version: Oracle-HTTP-Server/2.2.15 (Unix)Server built: Apr 2 2011 23:44:07
Server label: APACHE_11.1.1.5.0_LINUX.X64_110325.2001


6. To find the versions of schema installed in the MDS:

Login to the database with sys user as sysdba and give the below command:

SQL>Select * from schema_version_registry;
SQL>Select COMP_ID, COMP_NAME, version, status from schema_version_registry;


COMP_ID COMP_NAME OWNER VERSION STATUS
BAM BAM Services DEV_ORABAM 11.1.1.4.0 VALID
MDS Metadata Services DEV_MDS 11.1.1.6.0 VALID
ODI Master and Work Repository DEV_ODI_REPO 11.1.1.5.0 VALID
ORASDPM SDP Messaging DEV_ORASDPM 11.1.1.2.0 VALID
SOAINFRA SOA Infrastructure Services DEV_SOAINFRA 11.1.1.6.0 VALID
 

Tuesday, 15 May 2012

How to UNDEPLOY SOA Composite when soa-infra is down


How to Un-Deploy a SOA composite when soa-infra is down in Oracle Fusion Middleware 11g:
We deployed a BPEL component on our SOA managed server which lead to server crash. Even after trying to restart the server, the soa servers did not came up.
We were in a situation in which we were :
  • Unable to un-deploy the component which led to server crash
  •  Unable to start the servers.
In such a situation, we need to delete the BPEL component from the file system of the server(from the physical location)
SOA Managed servers have crashed. 

To recover from the issue, please start up the Admin Server of the domain and execute the below steps:

  • Copy the attached ShareSoaInfraPartition.ear(mail to amitja07@gmail.com for the attachement) file to the below location of the server.


$ cd MW_HOME/oracle_common/common/bin


Now give the below command:

$ ./wlst.sh
  • Once the wlst is initiated enter the below command:
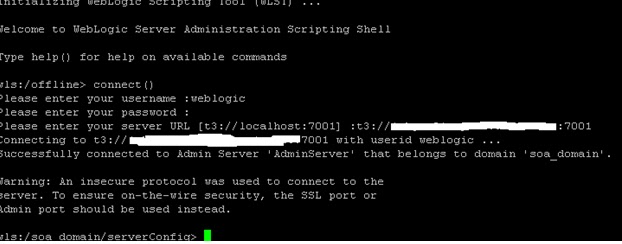
    • connect()
    • After entering the above command, you would be prompted to enter your username, password and url. Please provide the details in the below format


  • After entering the above credentials, wlst would connect to the admin server of the domain.
  • Now run the below command to deploy the ShareSoaInfraPartition.ear
    • deploy('ShareSoaInfraPartition','ShareSoaInfraPartition.ear',upload='true')

  • After the deployment is done, run the below command
    • exportMetadata(application='ShareSoaInfraPartition',server='AdminServer',toLocation='/dbdump/OraSOAS/Oracle/ServerDeployedComposites',docs='/deployed-composites/deployed-composites.xml')
  where server='AdminServer' is the name of the admin server
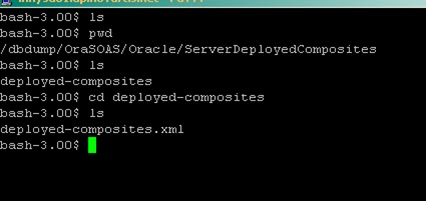
  toLocation='/dbdump/OraSOAS/Oracle/ServerDeployedComposites' is a location on your physical server at which the deployed-composites.xml file would get created


  • Running the above command would create a folder named deployed-composites at the toLocation (which was given in the command). This folder would contain deployed-composites.xml


  • Open the deployed-composite.xml file and delete the entry  of the composite  which needs to be deleted .
  • After deleting  the entry, run the below command:
    • importMetadata(application='ShareSoaInfraPartition',server='AdminServer',fromLocation='/dbdump/OraSOAS/Oracle/ServerDeployedComposites',docs='/deployed-composites/deployed-composites.xml')
  •    After running the above command, please restart the servers (both Admin and Managed Servers)
  •   The component would be deleted from the servers.

Reference : 1380835.1 from the Oracle Support Portal

Tuesday, 17 April 2012

How to Enable 1 way-SSL in Weblogic Server


Steps for configuring Inbound SSL in FMW

Scenario:
We have a Development Environment which has One Admin Server and three managed Server.
Admin Server runs on port 7001.
Managed Server1 (soa_server1) listens on port 8001
Managed Server2 (osb_server1) listens on port 8011
Managed Server3 (bam_server1) listens on port 9001

We need to configure osb_server1 to listen on ssl port 8012 using Custom Certificate to secure our webservices.
This certificate will be sent to business providers who will import it in their trusted Keystore.
Only the business partners who have this certificate imported in their trust store should be successfully able to invoke the webservice else they should get SSLHandshakeException

Steps Followed to generate a web service certificate:
1. CREATING A PRIVATE KEY IN KEY STORE:
<JAVA_HOME>\bin\keytool.exe -keystore <Path to a (new) key store> -storepass <(New) key store
password> -genkey -alias <Arbitrary Name> -keyalg RSA -dname <DN of certificate>

Concrete Example:
$ keytool -keystore  “/Oracle/Middleware/wlserver_10.3/server/lib/server_keystore.jks" -storepass "weblogic1" -genkey -alias "webservice_nexus" -keyalg RSA –dname "CN=fus@isdev,OU=webServices,OU=pkiObjects,DC=Nexus,DC=com"

2. CREATING A CERTIFICATE SIGNING REQUEST (CSR):
<JAVA_HOME>\bin\keytool.exe -keystore <Path to the key store> -storepass <Key store password>
-certreq -alias <Alias name from private key> -keypass <Password of private key> -file <Path
to CSR file to be created>

Concrete Example:
$ keytool  –keystore  "/Oracle/Middleware/wlserver_10.3/server/lib/server_keystore.jks " -storepass "weblogic1" -certreq -alias "webservice_nexus" -keypass "weblogic1" -file "/Oracle/Middleware/wlserver_10.3/server/lib /webService.csr"

3. GENERATING A CERTIFICATE:   
Submit the CSR file created in the last step to any of the trusted Certificate Authority.certificate authority will use a CSR to create your SSL certificate, but it does not need your private key. You need to keep your private key secret.
Download the certificate on the local hard drive.

4. INSTALLING WEB SERVICE CERTIFICATE IN KEY STORE:
<JAVA_HOME>\bin\keytool.exe -keystore <Path to the key store> -storepass <Key store password>
-import -alias <Alias name from private key> -keypass <Password of private key> -file <Path to
CER file containing the WSC>

Concrete Example:
$ keytool -keystore "/Oracle/Middleware/wlserver_10.3/server/lib/server_keystore.jks" -storepass "weblogic1" -import -alias "webservice_nexus" -keypass "weblogic1" -file "/Oracle/Middleware/wlserver_10.3/server/lib/Certificates/webservice_nexus.cer"

After Adding the certificate in the keystore, you can list the certificate by giving the following command:

5. LISTING THE CERTIFICATE:
<JAVA_HOME>\bin\keytool.exe –v –list -keystore <Path to the key store> -storepass <Key store password>

Concrete Example:
$ keytool –v –list –keystore server_keystore.jks 


After successful creating and adding the certificate in the keystore, we need to configure the server to use the custom keystore which we created.

  •          Login to the admin Console.
  •          Enter admin usename and password
  •          In the Home Page, go to Servers  --> osb_server1
  •          Go to keystores in the Configuration tab
o   Change the keystore to Custom Identity and Standard Java Trust
o   Enter the following details for Identity Keystore:
§  Custom Identity Keystore : /Oracle/Middleware/wlserver_10.3/server/lib/server_keystore.jks
§  Custom Identity Keystore Type: JKS
§  Custom Identity Keystore Passphrase: <password for keystore>
§  Confirm Custom Identity Keystore Passphrase: <password for keystore>
o   Save all the configurations.

  •         Now go to SSL in Configuration Tab
o   Enter the details for Private Key Alias : webservice_nexus
o   Enter the passphrase : <password for private key>
o   Go to advance, In hostname verificate make it NONE(if not already so).
o   Save all the changes made.

  •          Now go to General in Configuration Tab.
  •         Check the SSL Listen Port Enabled box
  •          SSL Listen Port should be 8012, if not enter it.
  •          Save all the changes.
  •          Finally restart the osb_server1.

Monday, 27 February 2012

How to Change/Update Password for AIA 11.1.1.4

If you are reading this, then you probably have gone through our previous POST.


When we change or update the weblogic Administrator Password, we need to update the AIA password as well because AIA installation is done on SOA which uses weblogic Password to Connect to SOA Server.

In the Oracle Guide they have mentioned two approaches to change the password.

First one did not work for me.

Let me discuss what actually worked.

Please follow the below steps exactly to successfully change or update the password for AIA:


  1. First, make sure that you have XManager installed if you have a remote server as we will be needing GUI.
  2. Go to the following location:
    AIA_HOME/util/UpdateStore
  3. Run the below command:
    ant -f $AIA_HOME/util/updateStore.xml updateStore -DAdminUsername=weblogic -DAminPassword=<the 'weblogic' user's password>
    Here 
    DAdminUsername is the weblogic Admin username(old username)
    and 
    DAminPassword is the weblogic Admin password(old password)
  4. A GUI window will pop up, there please enter the user id and password and then the XPATH for the password from the AIAInstallProperties.xml (i.e. /properties/fp/server/password)
    When the process is complete you should see the encrypted password in the AIAInstallProperties.xml file:
    <username>weblogic</username>
    <password>[C@29c58e</password>
  5. Repeat step 3 till all the weblogic password's are encrypted in the AIAInstallProperties.xml file.

Please let us know if you face any issues while updating the AIA password.


Wednesday, 15 February 2012

How To Change Weblogic Admin User's password

Often we have situation when we want to change the weblogic administrator's password. We give the default password while installation and later it becomes a problem to change it.

This is the situation which we faced in our development server.

Our server setup is such as, we have an Admin Server and three managed server(osb,bam,soa) on it.
It is a single node setup. Domain name is admin_domain

Follow the below steps to change the weblogic password:
  1. Login to the Oracle 11g Adminintration Console with the weblogic username and password,
    Navigate to    Secuity Realms-->myRealms(realm name)-->Migration(tab)-->Export(tab)
    Here please provide a Directory location for “Export Directory on Server:” TextBox (Example: /tmp)
    Click on “Save” button…you will find that in the Directory which you have specified you will get :

    DefaultAuthenticator.dat
    DefaultCredentialMapper.dat
    exportIndex.dat
    XACMLAuthorizer.dat
    XACMLRoleMapper.dat
  2. Now Shut Down all the servers which are running.
  3. Take the backup of Domain Directory.
  4. Navigate to the bin folder in the domain directory. i.e $Middleware_Home/user_projects/domain/admin_domain/bin
  5. Execute setDomainEnv.sh file in the command prompt. Make sure weblogic.jar is present in ClassPath.
  6. Navigate to  $Middleware_Home/user_projects/domain/admin_domain/security.
  7. Just for the safety take the backup of DefaultAuthenticatorInit.ldift file, because in the next step we are going to create new file "DefaultAuthenticatorInit.ldift"
    mv  DefaultAuthenticatorInit.ldift  DefaultAuthenticatorInit.ldift.bkup
  8. In the same directory give the following command :
    java weblogic.security.utils.AdminAccount newAdminUser newAdminPassword .           
    (make sure to give the '.' at the end)
    Here, newAdminUser -->the new user you want instead of weblogic
    newAdminPassword-->the new Password which is required to authenticate the Admin user
  9. Navigate to the  following path $Middleware_Home/user_projects/domain/admin_domain/servers/AdminServer/security. Here update the boot.properties file with the new username and password.
  10. Repeat step 9 for all the managed servers.
  11. Take the backup of the following directory  $Middleware_Home/user_projects/domain/admin_domain/servers/AdminServer/data/
    mv data data_bkup
  12. Time to Start the Admin Server.As we have already made an entry in the boot.properteis file, it will not ask for user name and password.
  13. Login to Admin Console by giving the new user name and password.
  14. Import the users and groups back by navigating to :
     Secuity Realms-->myRealms(realm name)-->Migration(tab)-->Import(tab)

    Provide the folder name (/tmp) where we have stored the above files.
    DefaultAuthenticator.dat
    DefaultCredentialMapper.dat
    exportIndex.dat
    XACMLAuthorizer.dat
    XACMLRoleMapper.dat
  15.  Now Go To,
    Home-->Domain-->Security(tab)
    In the advance section, give the new node manager username and password.
    After successfully completing these steps you should be able to change Weblogic Username's password.
  16. If you have AIA also installed on SOA, you need to follow some additional steps for AIA to change AIA password.
    Will cover that in separate POST.
    Enjoy :)