Tuesday 5 May 2015

Step by Step process to Install OSB : Oracle Service Bus 12C ( 12.1.3.0.0 version )

This post helps us to install OSB 12.1.3.0.0.

Before proceeding further make sure Weblogic 12.1.3.0.0 is installed. If not, please click here to install the required weblogic server.

Once the installation of weblogic server is completed, please follow the below steps to install the OSB 12.1.3.0.0

The installer to be used for OSB installation is : fmw_12.1.3.0.0_osb.jar and the required installer can be downloaded from edelivery.oracle.com

Execute the below command to start the OSB installer.

<Location where JDK is installed>/bin/java -jar <Location where WLS installer is located>/fmw_12.1.3.0.0_osb.jar

For Ex :
D:\MWHOME_12C\jdk1.7.0_67\bin\java -jar D:\All_Installers\OFMW\12C_Version\OSB\fmw_12.1.3.0.0_osb.jar

This will initiate the installer. Please proceed as per the steps below.

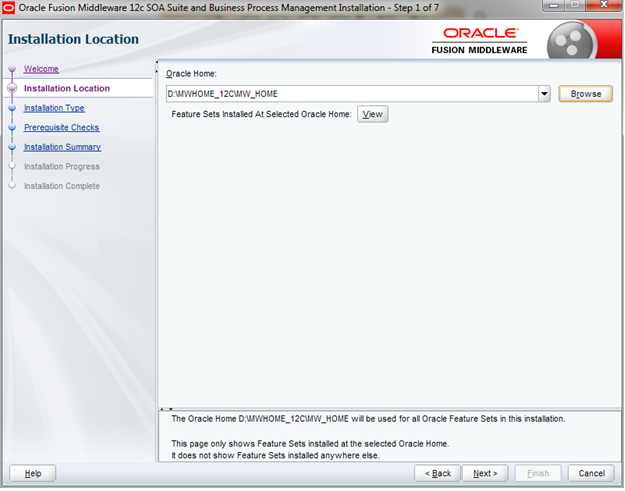
Click Next on the above screen. Installation location screen would appear. Provide the location where Weblogic Server is installed.

Click Next on the above screen. Installation Type screen would appear. Select Service Bus and click next.

Pre-Requisites would be checked in the below screen. Take appropriate action if any issue is reported. If no issue is reported, Click Next

Summary screen would appear. Analyze the information and click next

Installation progress would be displayed in the below screen

Once done, click finish to close the installer


This completes the installation of OSB : Oracle Service Bus installation ( 12C : 12.1.3.0.0 version )


Step by Step process to Install SOA 12C ( 12.1.3.0.0 version )

This post helps us to install SOA 12.1.3.0.0.

Before proceeding further make sure Weblogic 12.1.3.0.0 is installed. If not, please click here to install the required weblogic server.

Once the installation of weblogic server is completed, please follow the below steps to install the SOA 12.1.3.0.0

The installer to be used for SOA installation is : fmw_12.1.3.0.0_soa.jar and the required installer can be downloaded from edelivery.oracle.com

Execute the below command to start the SOA installer.

<Location where JDK is installed>/bin/java -jar <Location where WLS installer is located>/fmw_12.1.3.0.0_soa.jar

For Ex :
D:\MWHOME_12C\jdk1.7.0_67\bin\java -jar D:\All_Installers\OFMW\12C_Version\SOA\fmw_12.1.3.0.0_soa.jar

This will initiate the installer. Please proceed as per the steps below.

Click Next on the above screen. In the next screen, you would be prompted for Oracle Home. Please provide the location where Weblogic Server is installed and Click Next

Please select the SOA Suite in the below screen and Click Next

Pre-Requisites would be checked in the below screen. Take appropriate action if any issue is reported. If no issue is reported, Click Next

Summary screen would appear. Analyze the information and click next

Installation progress would be displayed in the below screen

Once done, click next on the below screen

Once done, click finish to close the installer


This completes the installation of SOA 12C ( 12.1.3.0.0 version )

Step by Step process to Install Weblogic 12C ( 12.1.3.0.0 version )

This post helps us to install Weblogic Server 12C (12.1.3.0.0 version ). In the long run this weblogic server home would be used to install SOA, OSB components.

Please use the installer : fmw_12.1.3.0.0_infrastructure.jar for installation of Weblogic server. If this is not used, then it might lead to multiple issues while installing SOA with respect to JRF libraries at a later point of time.

The required installer can be downloaded from edelivery.oracle.com

Below are the steps to be followed for installing WLS 12c version.


  1.  Install JDK : jdk-7u67-windows-x64 (Java SE Development Kit ). The version should be : java version "1.7.0_67"
  2. Install Weblogic Server.


Below are the steps to be followed for Weblogic Installation.

Run the command as below :

 <Location where JDK is installed>/bin/java -jar <Location where WLS installer is located>/fmw_12.1.3.0.0_infrastructure.jar
For Ex :
D:\MWHOME_12C\jdk1.7.0_67\bin\java -jar D:\All_Installers\OFMW\12C_Version\Infrastructure\V44416-01\fmw_12.1.3.0.0_infrastructure.jar

This will start the WLS installer. Follow the steps as per the below screen shots


Click Next. In the below screen provide Oracle Home to the location where Weblogic server needs to be installed. Then Click Next

Select Fusion Middleware Infrastructure and Click Next

In the below screen, pre-requisites would be checked. Take appropriate action, if any issue is reported in the below screen


The below step can be skipped by not providing any email address.

Click Next and installation process would begin as shown below.

Once done, review the below information and cick finish to close the installer as per below screen shot.


This will install the weblogic server at the location provided in the installer screen. Navigate to that location and check if the binaries have been installed.

We will be updating additions posts regarding the Installation and Configuration of SOA, OSB 12.1.3 version and the steps for domain creation.